

Hi,
Let’c cut to the chase. One areas we all can always work on is the core, so this month we’ll be focusing on a core challenge to help us get a stronger core, reduce inches and the waist line and start getting defined abs.
You can make a surprising amount of progress toward the ever-elusive goal of rock-solid, sculpted abs in just a week, with the right diet and exercise. No, you won't magically build a six-pack in 28 days, but you might see some visible lines and notice your middle's gotten leaner.
That said, there's no such thing as spot training, so if you want to lose belly fat or pesky love handles, you're going to have to shed body fat from head to toe. This means incorporating more fat-burning and muscle-building workouts — like high-intensity interval training (or HIIT) and resistance training — into your routine, in addition to core-focused exercises.
Why a Strong Core Is So Important
Building a strong core is about more than just seeing chiseled abs. A solid midsection comes with a range of benefits, including improved balance, reduced risk of lower back pain and better posture.
Even if you don't see signs of Instagram-worthy abs just yet, you'll find that everyday tasks, like lifting heavy groceries off the ground, lifting your kiddo overhead and opening doors, are a lot easier. And hey, let's be honest: In real life, nothing beats being able to move better and feel stronger.
Here are the 3 moves:
Move 1: Forearm Plank

Stack your shoulders over your elbows and extend your legs behind you to form a straight line from the top of your head to your heels.
Tuck your pelvis in and squeeze your quads and glutes to make your plank rock-solid.
Aim to hold a forearm plank for 30 seconds — or 10 seconds at a time for three rounds.
Tip
If you start to feel some strain in your lower back, raise your hips slightly to keep them aligned with the rest of your body and to take the pressure off the lumbar spine. That's why it's so important to tighten your entire body, including the quads and glutes, in a plank. This will help prevent muscle compensation and keep your body in a straight line throughout the movement, Bergeron says.
Move 2: Side Plank
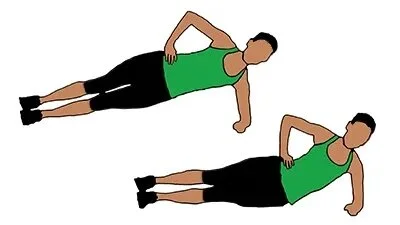
Lie on your side and prop yourself on your forearm, stacking your shoulder above your elbow and your top leg over your bottom leg.
Keep your head and neck in a neutral position by focusing on a point in front of you, not down at your feet.
Aim to hold a side plank for 30 seconds per side.
Tip
The key to a strong side plank is to keep your hips and shoulders square throughout the entire movement, not allowing them to rotate. Just like the forearm plank, you should be able to draw a straight line from your feet to the top of your head.
Move 3: Mountain Climber

Start in a high plank with your shoulders stacked directly over your wrists and your legs extended behind you with your feet about hip-width distance apart.
Drive your right knee toward your chest and kick it back out, immediately following it with your left knee.
Keep your hips low and in line with your back as you alternate driving your knees up toward your chest. Be sure to also fully extend your legs behind you as you bring each leg back out into a plank.
In case you're wondering why there aren't any crunches or sit-ups in sight on this plan, it's because the plank activates multiple muscle groups at once, which in turn burns more calories and builds more muscle throughout the body.
By building more muscle, you'll burn more calories and fat. That's because muscles are metabolically active, meaning they burn calories even at rest,
The schedule:
Monday
30-second forearm plank x 3 sets
15-second side plank x 3 sets per side
20 mountain climbers (10 per leg) x 2 sets
Tuesday
30-second forearm plank x 6 sets
15-second side plank x 3 sets per side
20 mountain climbers (10 per leg) x 2 sets
Wednesday
45-second forearm plank x 4 sets
30-second side plank x 3 sets per side
20 mountain climbers (10 per leg) x 3 sets
Thursday
45-second forearm plank x 6 sets
30-second side plank x 3 sets per side
30 mountain climbers (15 per leg) x 2 sets
Friday
1-minute forearm plank x 3 sets
30-second side plank x 4 sets per side
30 mountain climbers (15 per leg) x 2 sets
Saturday
1-minute forearm plank x 3 sets
30-second side plank x 4 sets per side
40 mountain climbers (20 per leg) x 2 sets
Sunday
1-minute forearm plank x 3 sets
45-second side plank x 3 sets per side
40 mountain climbers (20 per leg) x 2 sets
Repeat for the entire month.
Up the Intensity
After a week of these plank exercises, try adding more variations into your routine to challenge yourself and target even more muscles.
Variation 1: Plank Jack
Start in a high-plank position with your feet together and your shoulders stacked above your wrists.
While maintaining a straight line with your body, hop your feet away from each other until you're in a wide-legged plank.
Hop them back in to the starting position.
Continue hopping your feet in and out as you increase your speed.
Tip
Make sure to keep your back and hips aligned throughout the entire movement.
Variation 2: Plank Reach
From a forearm plank, reach your right arm straight out in front of you for 20 seconds.
Return your right arm to the floor and reach your left arm straight out in front of you for 20 seconds.
Tip
To help you balance on three limbs, widen your feet. Avoid rotating your hips and shoulders to one side while your arm is lifted off the ground.
Variation 3: Plank Reach With Leg Lift
Start in a forearm plank.
Simultaneously reach your right arm straight out in front of your and lift your left leg a few inches off the ground.
Hold for 20 seconds.
Return both limbs to forearm plank position.
Repeat on the other side.
Variation 4: Push-Up
Start in a high-plank position with your shoulders stacked over your wrists and your legs extended behind you.
Keeping your body tight and in a straight line, lower your chest and hips to hover above the floor, bending your elbows and pointing them back at 45 degrees.
Press through your hands to push yourself back up to the starting position.
Tip
If full push-ups are too challenging, do a modified push-up on your knees or standing with your hands on a wall.
Until next time,
Olan